Sunday, March 29, 2009

Photorealistic Wood Tutorial


  1. Create a new image, 500px wide x 4000px high, and choose these colors:


      Foreground: 81593F Background: 33291E


  2. Go to Filter > Render > Fibers and Use these settings:


      Variance: 10 Strength: 56
    If you want, you can press the Randomize button a few times until you get the look you want.


  3. Duplicate the layer
  1. With the top layer selected, go to Filter > Distort > Glass and use these settings:


      Distortion: 9 Smoothness: 13 Texture: Frosted Scaling: 108


  2. Change the layer blending options to


      Overlay Fill: 54%


  3. Now, merge the layers by pressing Ctrl + E
    CHECKPOINT - You psd fils should look something like this... except big and vertical...

  4. Go to Filter > Blur > Motion Blur an use these settings:


      Angle: 90 Distance: 50


  5. Create a new layer
  6. Go to Filter > Render > Clouds
  7. Go to Filter > Noise > Add Noise and use these settings:


      Amount: 9.27 Gaussian Monochromatic


  8. Change the layer blending options to:


      Screen Fill: 39%


  9. Create a new layer
  10. Go to Image > Apply Image and press OK
  11. Go to Filter > Blur > Gaussian Blur and use these settings:


      0.3 px


  12. Go to Image > Adjustments > Hue / Saturation and use these settings:


      Saturation: +41 Lightness: -26


  13. Go to Image > Adjustments > Brightness/Contrast and use these settings:


      Brightness: +11 Contrast: +56


  14. Change the layer blending options to:


      Overlay Fill: 40%


  15. Flatten the image
    CHECKPOINT - More progress...

  16. Create a small to medium sized vertical ellipse by using the Elliptical Marquee tool

  17. Go to Filter > Distort > Twirl and use these settings:


      Angle: 140


  18. Repeat numerous times by making different sized elliptical selections in various locations, making sure they follow the direction of the grain, and press Ctrl + F after each selection. These will be the knots in the wood.
  19. Go to Image > Adjustments > Hue/Saturation and adjust the Saturation and Lightness to your liking. I chose these settings:


      Saturation: -28 Lightness: -13


  20. Touch it up by using Dodge and Burn both on a fairly large brush size, low opacity, and set to Highlights. Next, try using different sizes and settings to perfect your wood so far.
  21. Select all and copy the image
  22. Make a new channel and paste it inside
  23. Go back to your layers and create a new layer
  24. Fill it with 9D5D4F
  25. Go to Filter > Render > Lighting Effects and use these settings:


      Style: Default Light type: Directional Intensity: 35 Gloss: -40 Material: 0 Exposure: 21 Ambience: 8 Texture Channel: Alpha 1 White is High Height: 16
    Be sure to set the light position so that It is turned 90° from the wood grain and so that the preview image is not lighter or darker than the actual image.


  26. Go to Filter > Blur > Smart Blur and use these settings:


      Radius: 78.9 Threshold: 88.5 Quality: High Mode: Normal


  27. Change Layer Blending Options to:


      Screen Fill: 61%


  28. Rotate canvas clockwise
    CHECKPOINT - Your psd file should look something like this so far... except bigger...


    Detail:


  29. Optional step - Grungy dust and paint...


    1. Pull out your grunge brushes. (Don't have any? You could search DeviantArt's huge selection, or go to websites like www.angryblue.com for splattery brushes)
    2. Set Your Foreground color to 20% grey
    3. create a new layer
    4. paint in some dirty worn looking paint with a large brush size and just click around in places. try to make it unique, so it doesn't just look like the brush. but whatever.
    5. create a new layer and set your foreground color to whatever you want your paint to be. just for now, go with a dark green.
    6. create a medium sized shape thing with the polygonal lasso tool somewhere in the middle of your board.
    7. Hit Ctrl+Shift+I (or go to select > inverse)
    8. Repeat step 32.4 but only around the masked selection, to get a sort of spray-painty look, like you set something on there and spray painted it.
    9. Press Ctrl+D
    10. grab (yes, grab) your blur tool and set it to a basic soft circular brush of about 24px
    11. blur the hard edges of your painted thing.
    12. next, create a new layer and choose a light grey foreground color.
    13. Now, take those grunge brushes and paint in a dusty look scattered thinly across the board (you must be careful of which brushes you choose. the wrong ones will give the wrong effect.).
    14. And maybe clean it up with a large grungy eraser
    15. maybe take those angryblue brushes and add some splattered paint
    16. CHECKPOINT - Here's what mine looked like with step 32 included:


Wednesday, March 4, 2009

Ray of Light Tutorial

Ray of Light Photoshop TutorialUse Photoshop to create and add a dramatic ray of light to your photos. It's easy, accurate, and fun!

Finding and Identifying the Light Source

Before we can create the ray of light, we need to separate the bright areas from the image.

Step 1

Open a photo you would like to edit. Or, you may use the photo used in this tutorial (from iStockPhoto).

Step 2

Before we start, we need to duplicate the layer (Layer> Duplicate or Ctrl+J).

Duplicate Layer

Step 3

To find and separate the light source in the photo, we'll use the Levels tool (Image> Adjustment> Levels or Ctrl+L). Drag the middle input slider all the way to the left.


Forming the Ray of Light

Step 4

Now that we have the light source identified, we can distort it into a ray of light. For this process, we'll use the Radial Blur filter (Filter> Blur> Radial Blur) with these properties set:
Amount: 100
Blur Method: Zoom
Quality: Best
After you have those properties set, click and drag the blur center to the area where you would like the ray of light to zoom out from.
Radial Blur Filter

Step 5

You'll notice that there are visible speckles on the ray of light. Don't worry about it, we can simply apply the filter two more times and most of it will be gone. Press Ctrl+F to redo the previous filter again. After the filter has been processed, press Ctrl+F again to redo the previous filter once more. In total, you'll have pressed Ctrl+F twice.
Ray of Light

Blending and Enhancing the Ray of Light

Step 6

Now that we have our ray of light created, we can blend it into the image by changing the blending mode of the current layer to Screen.
Screen

Step 7

The ray of light is blended into the photo but it doesn't seem very strong. To increase the visibility of the ray of light, we'll use the Levels tool (Image> Adjustments> Levels or Ctrl+L). Drag the right input slide towards the left to increase visibility. You may also press the Auto button to have Photoshop automatically set it to an appropriate level.
Levels Tool

Step 8

If you are working with a large image, you may notice that there are more speckles on the ray of light. To remove this, we'll use the Despeckle filter (Filter> Noise> Despeckle). Press Ctrl+F to repeat the filter until the speckles disappear. Use Despeckle filter sparingly because it will blur the ray of light.
undefined

Step 9

Now we need to erase the areas that the ray of light shouldn't visible at. To do this, we'll need to add a layer mask. Add a layer mask to the top layer (Layer> Layer Mask> Reveal All) and click on the thumbnail of the layer mask to ensure it has been selected.
Layer Mask

Step 10

With the layer mask selected, use the Eraser tool (E) to erase the areas where the light shouldn't appear.
Eraser Zoomed In

Step 11

To emphasize the colors of the ray of light, use the Hue/Saturation tool (Image> Adjustments> Hue/Saturation or Ctrl+U) to increase the saturation. Before you can use the Hue/Saturation tool, you need to click on the thumbnail of the ray of light layer.
Hue/Saturation

Final Results

Rollover the images below to see the before and after effect.

Ray of Light Photoshop Tutorial

Thursday, February 12, 2009

Bloom Photoshop Tutorial

Add a blissful glow to the highlights of a photo. This effect works well with portraits.

Preparing the Document

Step 1

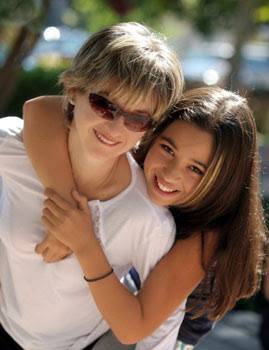
Open an image to edit.

Step 2

Duplicate the layer (Layer> Duplicate Layer or Ctrl+J) and change the blending mode of the new layer to Screen.

Add a layer mask to the top layer (Layer> Layer Mask> Reveal All). Make sure that the layer mask is selected.

Creating the Mask

In this section, we'll be editing the layer mask to mask out the effect from the shadows.


Step 3

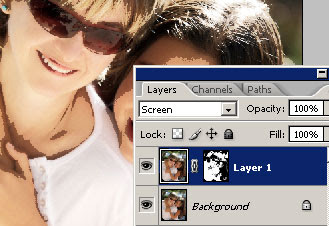
Use the Apply Image tool to apply the Background layer to the layer mask. To do this, open the Apply Image tool (Image> Apply Image) and change the Layer to Background and click OK.

Step 4

Hold the Alt key and click on the thumbnail of the layer mask.

Step 5

With the layer mask still activated, use the Threshold tool (Image> Adjustments> Threshold) and adjust the slider to define where the bloom Photoshop effect will be visible.

Adjusting the Effect

We're now ready to edit the effect. This section is where we'll see the bloom effect in action.

Step 6

Click on the thumbnail of the layer (not its layer mask) to deactivate the layer mask.

Step 7

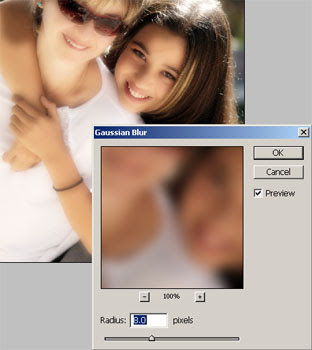
Open the Gaussian Blur filter (Filter> Blur> Gaussian Blur). Ensure that Preview is enabled and increase the radius to achieve your desired effect.

Step 8

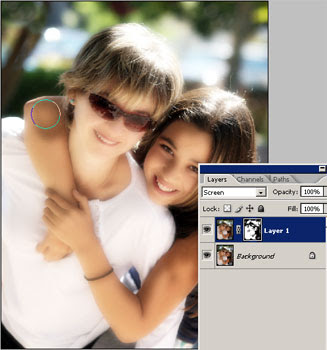
Inside the Layers pallet, click on the thumbnail of the layer mask to activate. Use the eraser tool (E) to erase the bloom Photoshop effect wherever you do not want the effect to appear. Use the brush tool (B) to add areas where you would like the effect to appear. To start, use a brush or eraser with a low hardness and an opacity of around 50%.

Press the "[" and "]" keys to adjust the size of the brush quickly.

Final Results
This effect creates a similar glow effect as the diffusion effect. The diffusion effect is more natural while the bloom effect is stronger and has more noticeable edges between the shadows and highlights. If you feel the Bloom effect is too strong for your photo and you want to preserve more details, try using the classic diffusion effect.